So i tried set up my first stream just for fun today and i noticed the audio quality is really bad compared to how it sounds live from my computer when i played. It sounds like its all treble and no bass at all. Is there some streaming equipment i need that i don't know about or what can the problem be? Any help is appreciated.
here is url to the stream https://www.twitch.tv/videos/360759998
Bad audio in stream please give advice
8 Jan 2019, 15:12 PM
#1
 1
1 Posts: 928
8 Jan 2019, 20:17 PM
#2
Posts: 2159 | Subs: 2
Getting good audio can be very difficult. Generically you are limited to the quality of microphone you are using. People with good sound have purchased a good microphone such as a Blue Yeti. If you are using your headset microphone the sound will usually be thin (no bass) etc.
There are several types of mics. There are also different sound pickup patterns associated with microphones. Electret, Dynamic, and condensor are microphone types. Cardioid and omnidirectional are the two main types of pickup pattern.
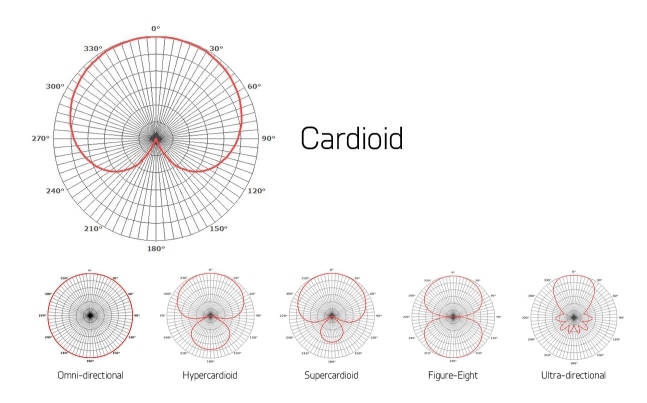
In the chart zero degrees is the area the microphone is pointed at. As you move off to the side or back the sounds volume will change and possibly be colored (change tone). Cardiod patterns try to reduce unwanted sounds from the sides and back of the mic. Omni picks up sound well from all directions.
The best sound for streaming would be a good condensor microphone. It would also be great if you could choose different pickup patterns. This is why the yeti is so popular. You plug it in and you are good to go. Sounds good and has selectable patterns. GG.
Headset microphones usually are cheap and thin sounding. And have very directional pickup patterns so your voice volume will change a lot depending on where your mouth is pointed in relation to the mic. Again, a good condensor will be less directional and more towards an omnidirectional pattern. So your volume will not fluctuate as much. Trade off being the more omni it is, the more keyboard and mouse sounds you will be picking up.
Next up is setting your volume. You never want to be able to speak into the mic and have the sound be so loud that it distorts (overdrives the amplifier). Like when some RNG plane lands on your whole army and you start screaming that Relic is anal cancer! The screaming will be distorted. You also dont want most of your speaking to be too quiet then destroy the listeners ears when you start screaming. A constant volume is what you are aiming for.
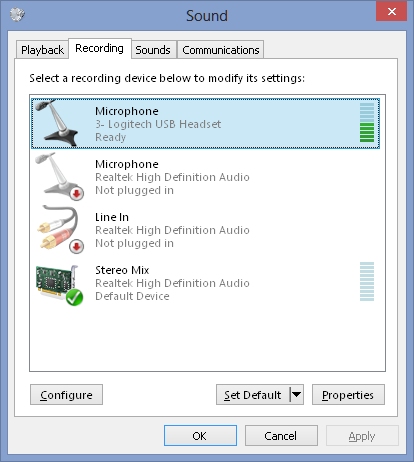
So you need to set the volume so that the loudest sound you ever make will not overload/distort. And you need to set it at the first gain stage. On some mics you can set the volume manually right on the mic or its USB cord. On most you need to set it in windows at the recording devices dialog.
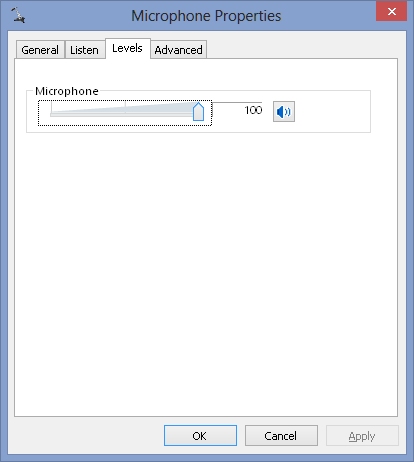
You will have more volume reducing options later but they will not help you if the sound is already distorted. You need it reduced at the source!
The dialog may have a VU meter or volume graph. You will want to make the loudest sound you will normally make and never max out the graph! In this example adjust the volume so you never have all of the green bars lit.
You should now be able to use OBS etc. However, you will still find that your volume changes a lot when you speak. The next step is COMPRESSION. Compression automatically monitors your volume and changes it when you are getting too loud. In OBS you can add a FILTER to your mic source.
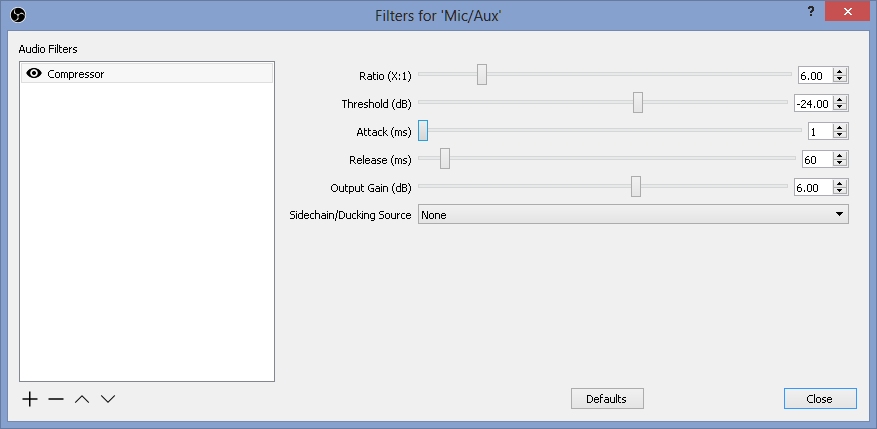
The default settings are decent. I Like to run closer to the example settings above. The important setting is threshold. The compressor does nothing until you are talking loud enough to hit the threshold volume. Then the compressor begins to work and reduces your volume. Ratio is how much will it turn down your volume after you are too loud. 6 to 10 is a good number. Too much and your loud parts become quieter than your soft parts and you get a "pumping" sound.
Since the compressor is now turning down your volume to keep you at a constant volume, your overall volume will be low. So you need to adjust the OUTPUT GAIN to bring the overall finished volume back up to the level you want on your stream.
Another side effect of the compressor is your noise floor will now be increased by the OUTPUT GAIN value. So if your mic is noisy (lots of hiss and background noise) it will now be even louder. So now you will want to add another filter such as the NOISE GATE or NOISE REDUCER. These filters are the opposite of the compressor. They turn your volume off until you start talking. Then they turn it up. This means less hiss and background when you are not talking.
When you pick your final volume you should be aware that sound adds. So if you have your mic at MAX possible volume and then COH2 is making sounds, you will overdrive and distort. So you want your final volume around -3 to -6 dB depending on how loud your other sounds sources are (game, music, etc).
The main thing you need is EQ at this point. Most USB mics and headsets will not give you any EQ options. That will give you the ability to boost the bass and try to fix that thin sounding mic.
There are several options to you from $30 to $3000.
OPTION 1: Low as $30.
Cheap headset. Done.
OPTION 2: Low as $50. Usually more like $100.
Decent USB condensor microphone.
OPTION 3: $150 and up.
There are some kits you can buy that will have a normal condensor mic and a USB preamp. This gives you slightly better quality of sound and may be useful for sounds external to the PC (guitars, keyboards, Xbox, etc) The Tascam Ministudio is a device dedicated to streaming and are usually around $100. The USB preamps usually offer no EQ capabilities. If they do, the EQ options may reside in a program that you need to run from them.
OPTION 4: $500 The big boys.
This option gets you to a mixer. You need a normal condensor mic. The mic plugs in to a mixer. The mixer has manual bass and treble controls, additional inputs, VU meters, etc. This gives you the most flexibility. You then will want a standalone compressor/gate. Then a USB preamp. With this setup you should be able to achieve pro level sound. Some companies may have a compressor built into the mixer. Behringer has some offerings as an example. However the compressor has little flexibility and no noise gate options. A seperate mixer/compressor option also has built in headroom so that you are much less likely to ever distort the sound.
Next is just good speaking habits. Watching a pro like Stormless you will notice he keeps a good distance from his mic and never changes the volume of his voice. As opposed to AE who is enthusiasctic and screams HOLY MOTHER OF GOD once in a awhile. Stormless never distorts and doesnt even need any compression. AE seriously needs loads of compression.
You dont want be so close to the mic that any head movement cause drastic volume changes. You also dont want the mic far from you or it will pick up background sounds and more importantly pick up echoes of sound in your room. Too far away and you may sound like you are in a toilet. To close and your volume will be all over. Physics also dictates some bass boost when you are too close to the mic (proximity effect).
You will need to play around with distance to your mouth and also the mic placement and direction. To get the best sound without echo. The echoes will also mix with your voice and cause the sound to be thin because the sounds are out of phase and cancel each other out. So closer is always better until it is not
You will also want some form of windscreen for your mic. Your breath across the mic will make nasty sounds so usually a foam covering is used to reduce this sound. Pros have windscreens that attach separate from the mic.
Here is an example setup from the web:
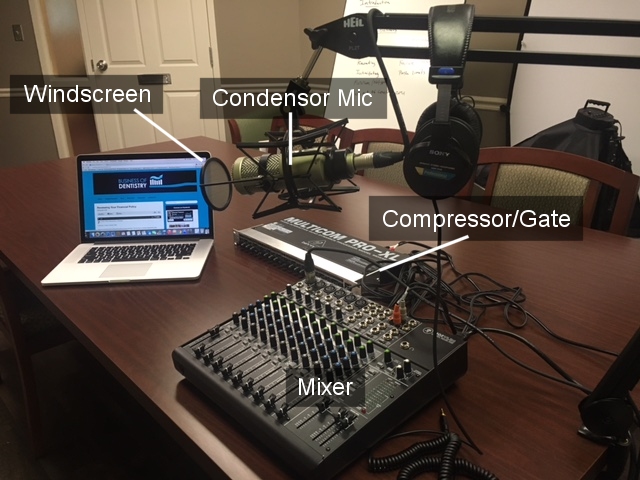
Also notice that this microphone is being suspended to reduce vibrations. Most condensors will have this type of mic mounting. A Blue Yeti does not, and will pickup vibrations from you touching the desk, typing, clicking, cars going by, etc. You can always fold up a towel and put the yeti on top of it to uncouple the mic from the desk/table you have it setting on. Be creative or spend some cash its up to you.
TLDR
Get a Yeti.
Hopefully some guys will give you some example setups they use and how they set their software. If not I would guess a good condensor mic like a yeti and look to see if they have software that goes with it that may let you do EQ etc. There are a ton of off brand setups on Amazon. Mics and speakers are weird because cost does not always equal good sound. Read lots of user reviews before purchasing. Some $25 chinese knockoff may be all you need or maybe a $500 Rode is what you want.
This field is changing daily as manufacturers are balancing giving you what you need and making you pay a lot for the separate pieces. Why give you an all in one solution when they can make you pay for each piece. The Tascam miniStudio is a step in the right direction. The cheap Behringer mixers that have USB and compression are another. They are just not quite there yet.
There are several types of mics. There are also different sound pickup patterns associated with microphones. Electret, Dynamic, and condensor are microphone types. Cardioid and omnidirectional are the two main types of pickup pattern.

In the chart zero degrees is the area the microphone is pointed at. As you move off to the side or back the sounds volume will change and possibly be colored (change tone). Cardiod patterns try to reduce unwanted sounds from the sides and back of the mic. Omni picks up sound well from all directions.
The best sound for streaming would be a good condensor microphone. It would also be great if you could choose different pickup patterns. This is why the yeti is so popular. You plug it in and you are good to go. Sounds good and has selectable patterns. GG.
Headset microphones usually are cheap and thin sounding. And have very directional pickup patterns so your voice volume will change a lot depending on where your mouth is pointed in relation to the mic. Again, a good condensor will be less directional and more towards an omnidirectional pattern. So your volume will not fluctuate as much. Trade off being the more omni it is, the more keyboard and mouse sounds you will be picking up.
Next up is setting your volume. You never want to be able to speak into the mic and have the sound be so loud that it distorts (overdrives the amplifier). Like when some RNG plane lands on your whole army and you start screaming that Relic is anal cancer! The screaming will be distorted. You also dont want most of your speaking to be too quiet then destroy the listeners ears when you start screaming. A constant volume is what you are aiming for.
So you need to set the volume so that the loudest sound you ever make will not overload/distort. And you need to set it at the first gain stage. On some mics you can set the volume manually right on the mic or its USB cord. On most you need to set it in windows at the recording devices dialog.

You will have more volume reducing options later but they will not help you if the sound is already distorted. You need it reduced at the source!
The dialog may have a VU meter or volume graph. You will want to make the loudest sound you will normally make and never max out the graph! In this example adjust the volume so you never have all of the green bars lit.

You should now be able to use OBS etc. However, you will still find that your volume changes a lot when you speak. The next step is COMPRESSION. Compression automatically monitors your volume and changes it when you are getting too loud. In OBS you can add a FILTER to your mic source.

The default settings are decent. I Like to run closer to the example settings above. The important setting is threshold. The compressor does nothing until you are talking loud enough to hit the threshold volume. Then the compressor begins to work and reduces your volume. Ratio is how much will it turn down your volume after you are too loud. 6 to 10 is a good number. Too much and your loud parts become quieter than your soft parts and you get a "pumping" sound.
Since the compressor is now turning down your volume to keep you at a constant volume, your overall volume will be low. So you need to adjust the OUTPUT GAIN to bring the overall finished volume back up to the level you want on your stream.
Another side effect of the compressor is your noise floor will now be increased by the OUTPUT GAIN value. So if your mic is noisy (lots of hiss and background noise) it will now be even louder. So now you will want to add another filter such as the NOISE GATE or NOISE REDUCER. These filters are the opposite of the compressor. They turn your volume off until you start talking. Then they turn it up. This means less hiss and background when you are not talking.
When you pick your final volume you should be aware that sound adds. So if you have your mic at MAX possible volume and then COH2 is making sounds, you will overdrive and distort. So you want your final volume around -3 to -6 dB depending on how loud your other sounds sources are (game, music, etc).
The main thing you need is EQ at this point. Most USB mics and headsets will not give you any EQ options. That will give you the ability to boost the bass and try to fix that thin sounding mic.
There are several options to you from $30 to $3000.
OPTION 1: Low as $30.
Cheap headset. Done.
OPTION 2: Low as $50. Usually more like $100.
Decent USB condensor microphone.
OPTION 3: $150 and up.
There are some kits you can buy that will have a normal condensor mic and a USB preamp. This gives you slightly better quality of sound and may be useful for sounds external to the PC (guitars, keyboards, Xbox, etc) The Tascam Ministudio is a device dedicated to streaming and are usually around $100. The USB preamps usually offer no EQ capabilities. If they do, the EQ options may reside in a program that you need to run from them.
OPTION 4: $500 The big boys.
This option gets you to a mixer. You need a normal condensor mic. The mic plugs in to a mixer. The mixer has manual bass and treble controls, additional inputs, VU meters, etc. This gives you the most flexibility. You then will want a standalone compressor/gate. Then a USB preamp. With this setup you should be able to achieve pro level sound. Some companies may have a compressor built into the mixer. Behringer has some offerings as an example. However the compressor has little flexibility and no noise gate options. A seperate mixer/compressor option also has built in headroom so that you are much less likely to ever distort the sound.
Next is just good speaking habits. Watching a pro like Stormless you will notice he keeps a good distance from his mic and never changes the volume of his voice. As opposed to AE who is enthusiasctic and screams HOLY MOTHER OF GOD once in a awhile. Stormless never distorts and doesnt even need any compression. AE seriously needs loads of compression.
You dont want be so close to the mic that any head movement cause drastic volume changes. You also dont want the mic far from you or it will pick up background sounds and more importantly pick up echoes of sound in your room. Too far away and you may sound like you are in a toilet. To close and your volume will be all over. Physics also dictates some bass boost when you are too close to the mic (proximity effect).
You will need to play around with distance to your mouth and also the mic placement and direction. To get the best sound without echo. The echoes will also mix with your voice and cause the sound to be thin because the sounds are out of phase and cancel each other out. So closer is always better until it is not

You will also want some form of windscreen for your mic. Your breath across the mic will make nasty sounds so usually a foam covering is used to reduce this sound. Pros have windscreens that attach separate from the mic.
Here is an example setup from the web:

Also notice that this microphone is being suspended to reduce vibrations. Most condensors will have this type of mic mounting. A Blue Yeti does not, and will pickup vibrations from you touching the desk, typing, clicking, cars going by, etc. You can always fold up a towel and put the yeti on top of it to uncouple the mic from the desk/table you have it setting on. Be creative or spend some cash its up to you.
TLDR
Get a Yeti.
Hopefully some guys will give you some example setups they use and how they set their software. If not I would guess a good condensor mic like a yeti and look to see if they have software that goes with it that may let you do EQ etc. There are a ton of off brand setups on Amazon. Mics and speakers are weird because cost does not always equal good sound. Read lots of user reviews before purchasing. Some $25 chinese knockoff may be all you need or maybe a $500 Rode is what you want.
This field is changing daily as manufacturers are balancing giving you what you need and making you pay a lot for the separate pieces. Why give you an all in one solution when they can make you pay for each piece. The Tascam miniStudio is a step in the right direction. The cheap Behringer mixers that have USB and compression are another. They are just not quite there yet.
8 Jan 2019, 20:59 PM
#3
 1
1 Posts: 928
Sorry if i did not explain well enough. I meant the ingame sounds are way weaker and all treble no bass at all in the stream compared to how they sound on my computer while playing. And i stream at 5000 bitrate. I don't even use a mic.
8 Jan 2019, 21:05 PM
#4
Posts: 2159 | Subs: 2
I forgot to add that the Yeti and other USB solutions are best because the mic input on most PC sound cards is complete garbage and should never be used. It will be noisy with hiss and usually will make buzzing sounds as you move your mouse. If you have a standalone card you may be OK. But note that most mics are not meant to be used on a PC pinout and will have the wrong connection/cable.
A generic mic has low signal voltage output and has to be amplified a lot. Anytime you amplify something, you will be adding noise. Since the PC preamp chips are right on the motherboard that is making all sorts of electrical noise, that noise will get picked up and amplified by the close proximity preamp. This is also why your case is metal. To create a faraday cage that prevents the electrical noise from escaping into the world. And the manufacturers are going to use cheap chips not good chips.
For USB solutions, the preamp is no where near the computer motherboard. They are either in the mic itself or in a separate box. And they will use the best chips/solutions they can for the application.
So you want a mic that has a USB cord if you want a standalone solution.
If you want the ability to expand later you will want a mic with an XLR audio connection that plugs into a USB preamp. This will let you get a mixer/compressor later if you want to.
USB MICROPHONE EXAMPLE
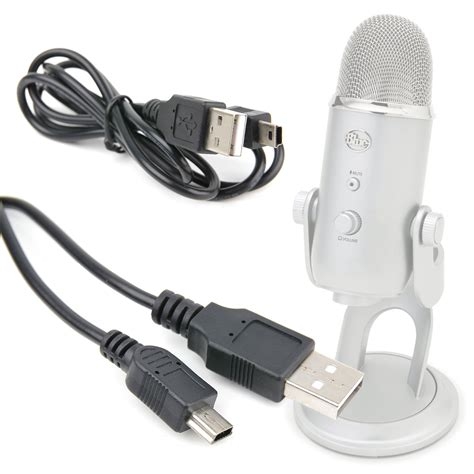
The sound is converted from mechanical vibrations to digital information inside the microphone. The digital information will not be effected by noise etc. Only a USB cable is used to send the digital info. The mic is also powered from the USB cable.
STANDARD MIC EXAMPLE
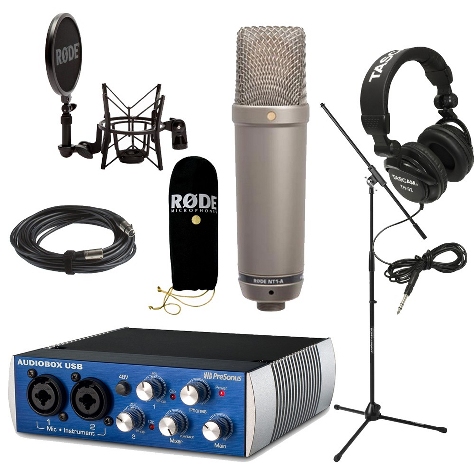
The sound is converted to analog voltages and sent from the mic to the preamp. The preamp converts the analog voltages to digital information. The analog cabling is susceptible to noise and interference. The mic uses a XLR balanced cable that reduces noise pickup.
NOTE: Condensor mics need a voltage applied to them to operate. This is called phantom power in the sound industry. And must be turned on at the mixer/preamp or you will get no sound. For most pro mics the voltage is 48 volts. You may see PHANTOM or 48V as the option. I think the standard comes from old phone systems using 48v Hmmmm.
Wow this turned into a book
A generic mic has low signal voltage output and has to be amplified a lot. Anytime you amplify something, you will be adding noise. Since the PC preamp chips are right on the motherboard that is making all sorts of electrical noise, that noise will get picked up and amplified by the close proximity preamp. This is also why your case is metal. To create a faraday cage that prevents the electrical noise from escaping into the world. And the manufacturers are going to use cheap chips not good chips.
For USB solutions, the preamp is no where near the computer motherboard. They are either in the mic itself or in a separate box. And they will use the best chips/solutions they can for the application.
So you want a mic that has a USB cord if you want a standalone solution.
If you want the ability to expand later you will want a mic with an XLR audio connection that plugs into a USB preamp. This will let you get a mixer/compressor later if you want to.
USB MICROPHONE EXAMPLE

The sound is converted from mechanical vibrations to digital information inside the microphone. The digital information will not be effected by noise etc. Only a USB cable is used to send the digital info. The mic is also powered from the USB cable.
STANDARD MIC EXAMPLE

The sound is converted to analog voltages and sent from the mic to the preamp. The preamp converts the analog voltages to digital information. The analog cabling is susceptible to noise and interference. The mic uses a XLR balanced cable that reduces noise pickup.
NOTE: Condensor mics need a voltage applied to them to operate. This is called phantom power in the sound industry. And must be turned on at the mixer/preamp or you will get no sound. For most pro mics the voltage is 48 volts. You may see PHANTOM or 48V as the option. I think the standard comes from old phone systems using 48v Hmmmm.
Wow this turned into a book

8 Jan 2019, 21:34 PM
#5
Posts: 2159 | Subs: 2
Sorry if i did not explain well enough. I meant the ingame sounds are way weaker and all treble no bass at all in the stream compared to how they sound on my computer while playing. And i stream at 5000 bitrate. I don't even use a mic.
This may depend on your streaming software.
1. The game has a volume control. Turn it all the way up.
2. Windows then has a volume control for the game that can be adjusted.
3. Windows has its OVERALL volume that can be adjusted.
4. Then the streaming software will have a volume control for desktop audio. Make sure that is turned up as well.
Any one of those could be off. To me it sounded like you are streaming from a laptop and the laptop mic was picking up the speakers. Maybe do a test where your MIC volume is set to zero in the streaming software.
The thin sound could be because the volume was just so low that it was compression/digitization noise. The sound was so quiet there were not enough bits to represent it correctly in the codec. The bit rate of the audio should be minimum 64 kbs. 192 kbs is approx CD quality. You listed 5000 which is most likely the video compression bandwidth or the combination of both. 5000 kbs is normal for HD video.
Someone could help better if you state what streaming software you are using.
8 Jan 2019, 23:07 PM
#6

Posts: 1467 | Subs: 4
Well first off it is WAY to quiet. I had to double my audio setup just to be able to here your gameplay?
Is this what you are talking about?
How are you capturing the audio? Through what software? Any hardware?
What are your in game settings?
Is this what you are talking about?
How are you capturing the audio? Through what software? Any hardware?
What are your in game settings?
12 Mar 2019, 04:47 AM
#7
Posts: 2159 | Subs: 2
CLIPPING - Why it is important to adjust your volumes.
Clipping is the distortion of a signal that is trying to create a voltage/current that the amplifier is not capable of producing. The easy example is a sine wave that has a loud spike in it. The loud spike requires a volume(voltage) that exceeds the maximum possible output volume (voltage).
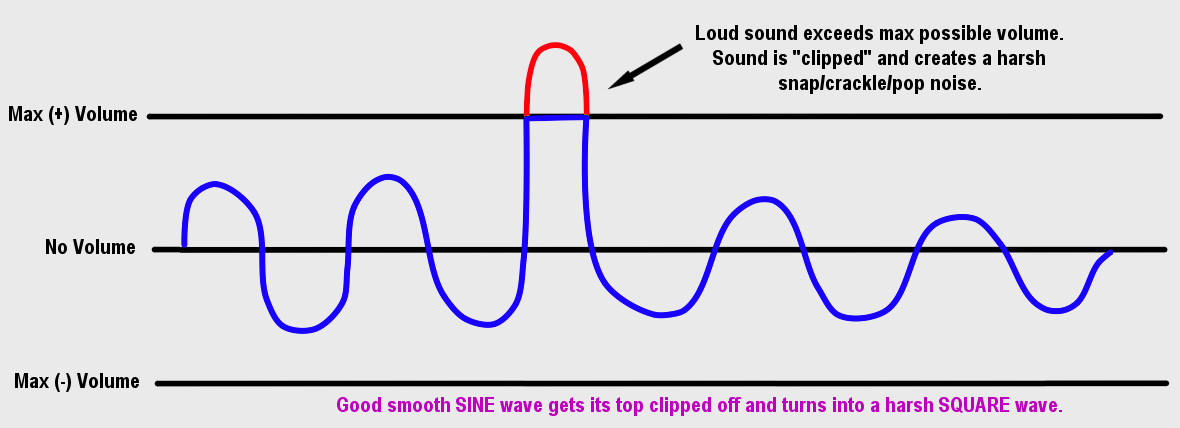
In this example our smooth bell tone (SINE) gets turned into a cracking KUH or SNAP sound. The RED line shows what the actual sound was and you can see that the blue sinusoidal wave gets its head chopped off.
Clipping can happen anywhere in your sounds signal chain. Once they occur you will have distortion etc that cannot be fixed in real time (yet).
MIC
The sound starts as air pressure changes with your voice as you squirt air thru your meat. These air pressure changes move a diaphram in an electrical field that acts as an Alternating Current Generator. The movement creates a very small electrical voltage from the generator. If the sound is extremely loud you will cause the diaphram to reach its maximum movement and you will get mechanical clipping. You may also get some electrical voltage/current clipping.
PREAMP
The low voltage microphone output is too small to hear. It needs to be amplified. If the mics out-going signal is too loud it will clip in the preamp. The preamp volume can be on the mic, mixer, etc if you are using standard analog audio equipment. If you are using a USB mic, the preamp volume is usually the WINDOWS sound volume for that device.
At this point, the original air pressure changes have been converted to analog voltages. The next step is digitization. An Analog-to-Digital (ADC) converter is used to convert the incoming analog signal to a digital number. This is done inside the mic if using a USB mic. Inside the External preamp if USB. Or inside your computers sound card if using the3.5mm analog mic input.
Programs in WINDOWS can now work with this digital number stream of audio. Standard audio is 16 bit signed sampled at 44.1 kHz. The voltage alternates positive and negative. So the digital sample numbers range from -32767 to +32768. Sampling means it records a number 44100 times per second, ie chops the sound into little pieces. A mathmatical rule (Nyquist) states you want to sample at least twice as many samples as the requencies you are trying to represent. Humans hear 20Hz to 20kHz. 44.1Khz is over double 20 kHz.
The programs you use on your PC such as OBS, etc can now increase or lower the volume by multiplying these numbers. And of course, if the numbers exceed 32768, they will get clipped to 32768 and the audio information above that is lost forever. So you are never safe from clipping. It can occur at every stage of your audio chain.
VU METER
Many of the devices in this signal chain will give you a VU meter. This is a little meter that tells you how loud you are. These are provided so you NEVER clip your signal. VU METER WIKIPEDIA
You want to figure out what is the loudest sound you will ever make and verify that the VU meter never gets maxed out. Adjust your volume starting at the first stage Mic volume/mixer volume/Windows volume for the device. In a perfect world you would want your voice to peak at around -3 to -6 dB so that you are very loud but not loud enough to clip.
Clipping is also a form of COMPRESSION. As it chops the sounds and limits how loud they can be. So crank it up and sound like a pissed off robot if you want
Clipping is the distortion of a signal that is trying to create a voltage/current that the amplifier is not capable of producing. The easy example is a sine wave that has a loud spike in it. The loud spike requires a volume(voltage) that exceeds the maximum possible output volume (voltage).

In this example our smooth bell tone (SINE) gets turned into a cracking KUH or SNAP sound. The RED line shows what the actual sound was and you can see that the blue sinusoidal wave gets its head chopped off.
Clipping can happen anywhere in your sounds signal chain. Once they occur you will have distortion etc that cannot be fixed in real time (yet).
MIC
The sound starts as air pressure changes with your voice as you squirt air thru your meat. These air pressure changes move a diaphram in an electrical field that acts as an Alternating Current Generator. The movement creates a very small electrical voltage from the generator. If the sound is extremely loud you will cause the diaphram to reach its maximum movement and you will get mechanical clipping. You may also get some electrical voltage/current clipping.
PREAMP
The low voltage microphone output is too small to hear. It needs to be amplified. If the mics out-going signal is too loud it will clip in the preamp. The preamp volume can be on the mic, mixer, etc if you are using standard analog audio equipment. If you are using a USB mic, the preamp volume is usually the WINDOWS sound volume for that device.
At this point, the original air pressure changes have been converted to analog voltages. The next step is digitization. An Analog-to-Digital (ADC) converter is used to convert the incoming analog signal to a digital number. This is done inside the mic if using a USB mic. Inside the External preamp if USB. Or inside your computers sound card if using the3.5mm analog mic input.
Programs in WINDOWS can now work with this digital number stream of audio. Standard audio is 16 bit signed sampled at 44.1 kHz. The voltage alternates positive and negative. So the digital sample numbers range from -32767 to +32768. Sampling means it records a number 44100 times per second, ie chops the sound into little pieces. A mathmatical rule (Nyquist) states you want to sample at least twice as many samples as the requencies you are trying to represent. Humans hear 20Hz to 20kHz. 44.1Khz is over double 20 kHz.
The programs you use on your PC such as OBS, etc can now increase or lower the volume by multiplying these numbers. And of course, if the numbers exceed 32768, they will get clipped to 32768 and the audio information above that is lost forever. So you are never safe from clipping. It can occur at every stage of your audio chain.
VU METER
Many of the devices in this signal chain will give you a VU meter. This is a little meter that tells you how loud you are. These are provided so you NEVER clip your signal. VU METER WIKIPEDIA
You want to figure out what is the loudest sound you will ever make and verify that the VU meter never gets maxed out. Adjust your volume starting at the first stage Mic volume/mixer volume/Windows volume for the device. In a perfect world you would want your voice to peak at around -3 to -6 dB so that you are very loud but not loud enough to clip.
Clipping is also a form of COMPRESSION. As it chops the sounds and limits how loud they can be. So crank it up and sound like a pissed off robot if you want

28 Oct 2019, 22:10 PM
#8

Posts: 16
Great post Rosbone, cheers man! 

13 Nov 2019, 03:36 AM
#9

Posts: 951
Rosbone you should make a guide.
PAGES (1)

1 user is browsing this thread:
1 guest
Livestreams
 |
|
|
10 | ||
 |
|
|
11 | ||
 |
|
|
1 |
Ladders Top 10
-
#Steam AliasWL%Streak
- 1.43163.872+9
- 2.59482.879+8
- 3.13244.750+6
- 4.286162.638+4
- 5.18151.780+4
- 6.313114.733+9
- 7.800456.637-3
- 8.376255.596+2
- 9.17773.708+3
- 10.14165.684+9
Replay highlight
VS
-
 cblanco ★
 -
 보드카 중대
-
 VonManteuffel
 -
 Heartless Jäger
Einhoven Country


Honor it
14
Download
1362
Board Info
468 users are online:
468 guests
1 post in the last 24h
7 posts in the last week
69 posts in the last month
7 posts in the last week
69 posts in the last month
Registered members: 53473
Welcome our newest member, Dolem490
Most online: 2043 users on 29 Oct 2023, 01:04 AM
Welcome our newest member, Dolem490
Most online: 2043 users on 29 Oct 2023, 01:04 AM


