Introduction
It is important to note that I will be talking about the tactics and strategy that are most likely to be employed. The fact that a 4v4 battleground has eight individuals may lead to completely unconventional and funky skirmishes and frontlines.
Overview of the Map
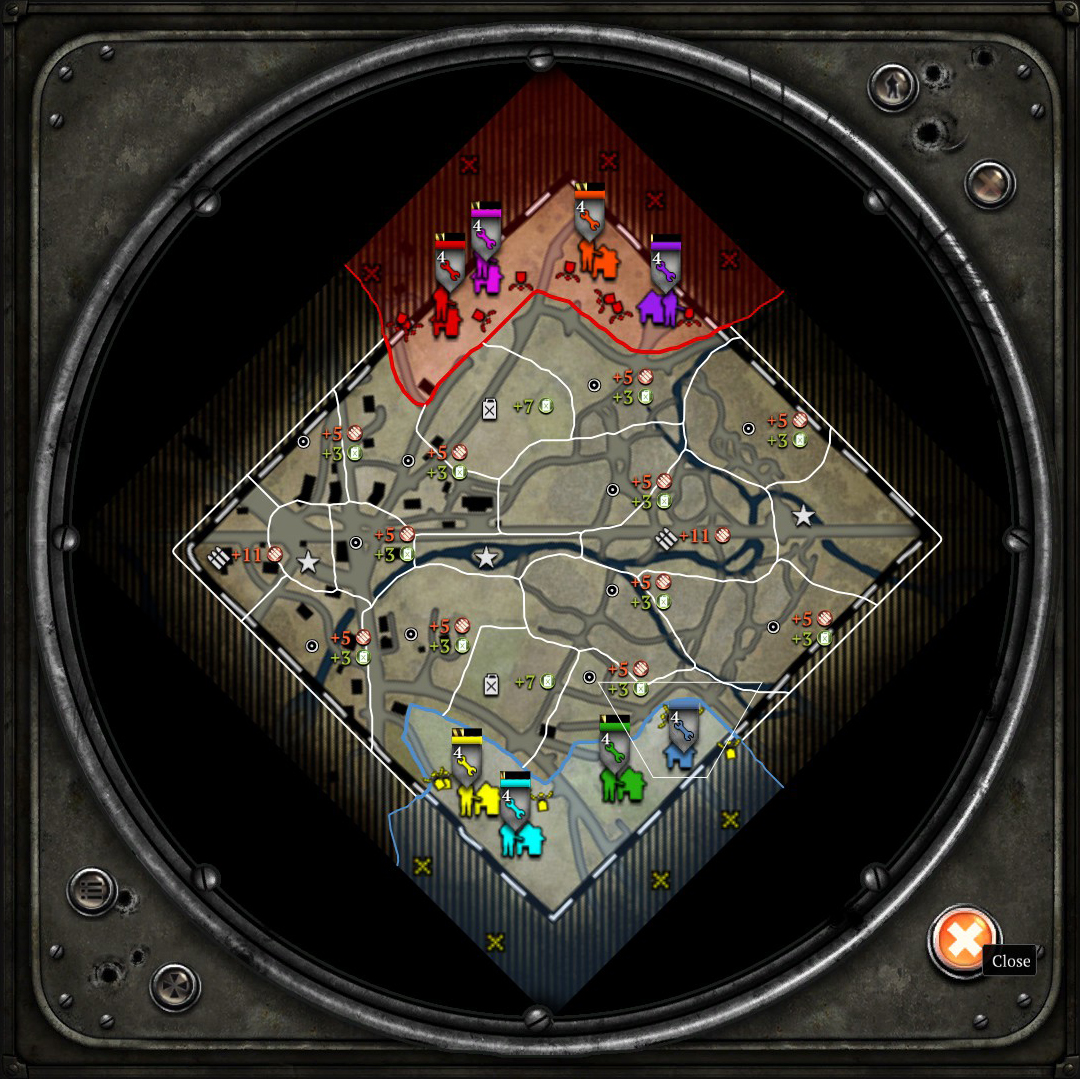
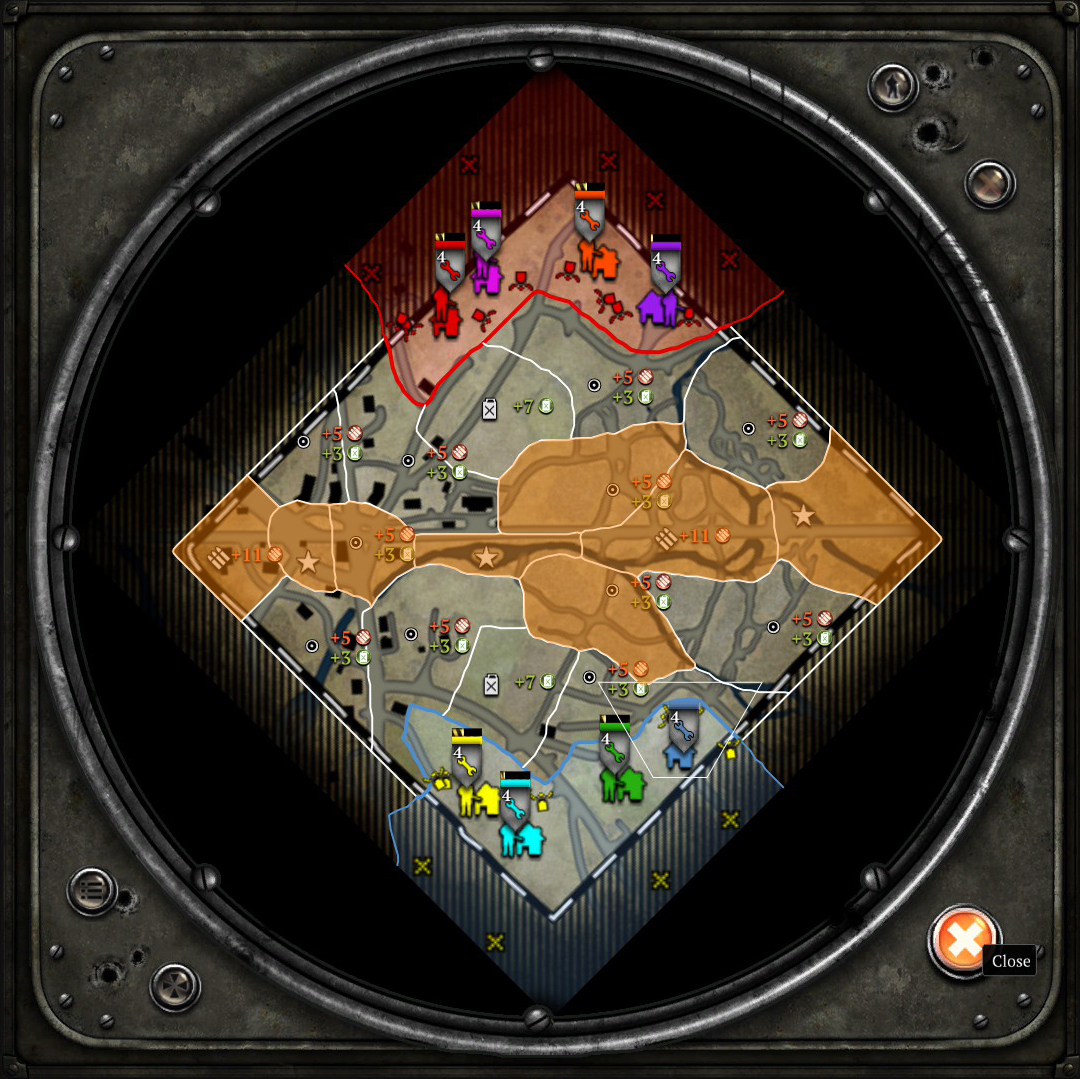
Figure 1.01 Tactical map.
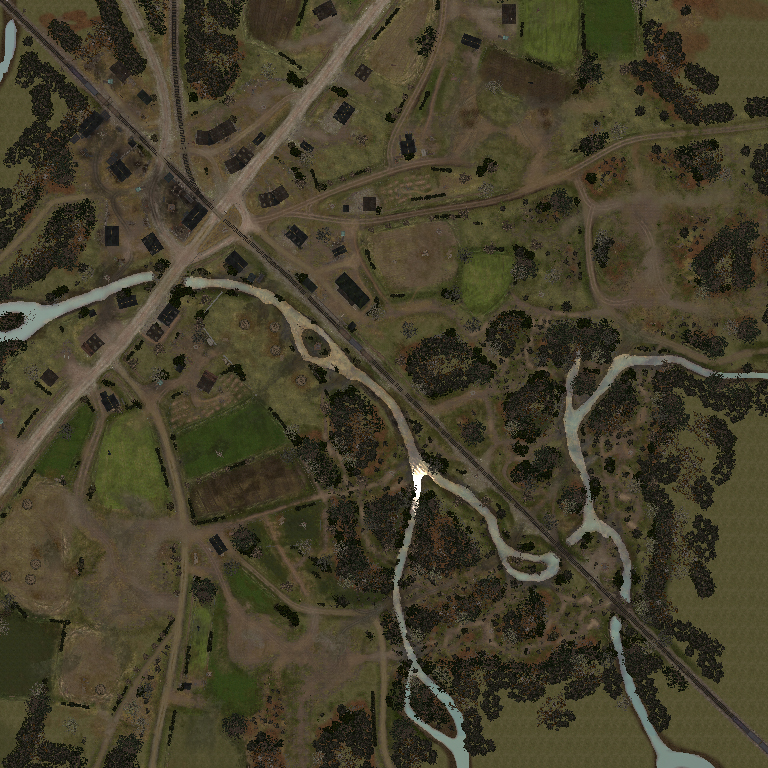
Figure 1.02 Aerial view of the map.
As seen in the in-game tactical map, this map has three parts: a town with many buildings, open fields and a forest with a little stream running across the map. The town has many buildings that induce early building grabs; these buildings stay relevant throughout the game. The middle part has a stream and a train track with a railroad wagon that constantly interferes with fighting, an over-watching train station on the northern side and big haystacks on the southern side that break the open field. The forest is a labyrinth of small paths full of trees inaccessible to light vehicles; paths wide enough can be ploughed using medium class vehicles.
Territories Adjacent to Bases
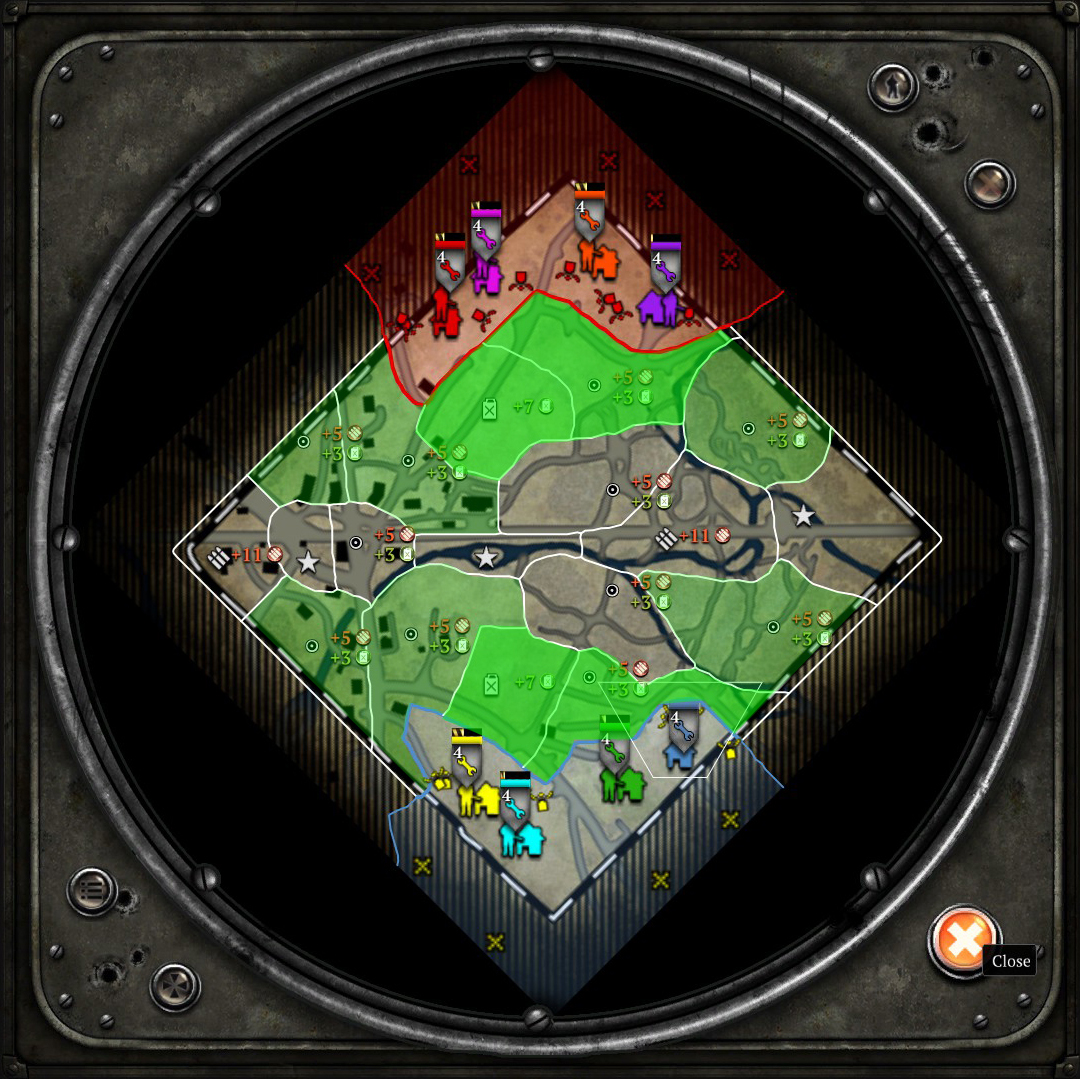
Figure 1.10 Adjacent territories near base sectors. Light green means relatively safe and solid green means really safe.
They include one fuel sector and four normal sectors for each team.The sectors that are directly connected to each team’s bases are one fuel and two normal sectors. Two more normal sectors are on the wings of each aforementioned normal sector. These sectors are deemed safe.
*This is untrue when you have an unstable frontline. If the frontline is waving back and forth drastically or you have to constantly move forces to repel attacks, thus leaving some areas completely empty, it is very possible for your foes to harass even the fuel sector. However, since these territories are really close to base sectors, a simple harassment would not be able to hold the territories for a long time.
Figure 1.11 Top left safe sectors. Orange represents combat zone, yellow represents caution zone.
Figure 1.12 Top right safe sectors.
Figure 1.13 Bottom left safe sectors.
Figure 1.14 Bottom right safe sectors.
One fuel and one normal sector are really close to the each base, thus making harassing the fuel very difficult. This also means that the normal point is a very good place for an early cache. The other normal sectors indicated are also good for caches, but they are closer to the frontline.
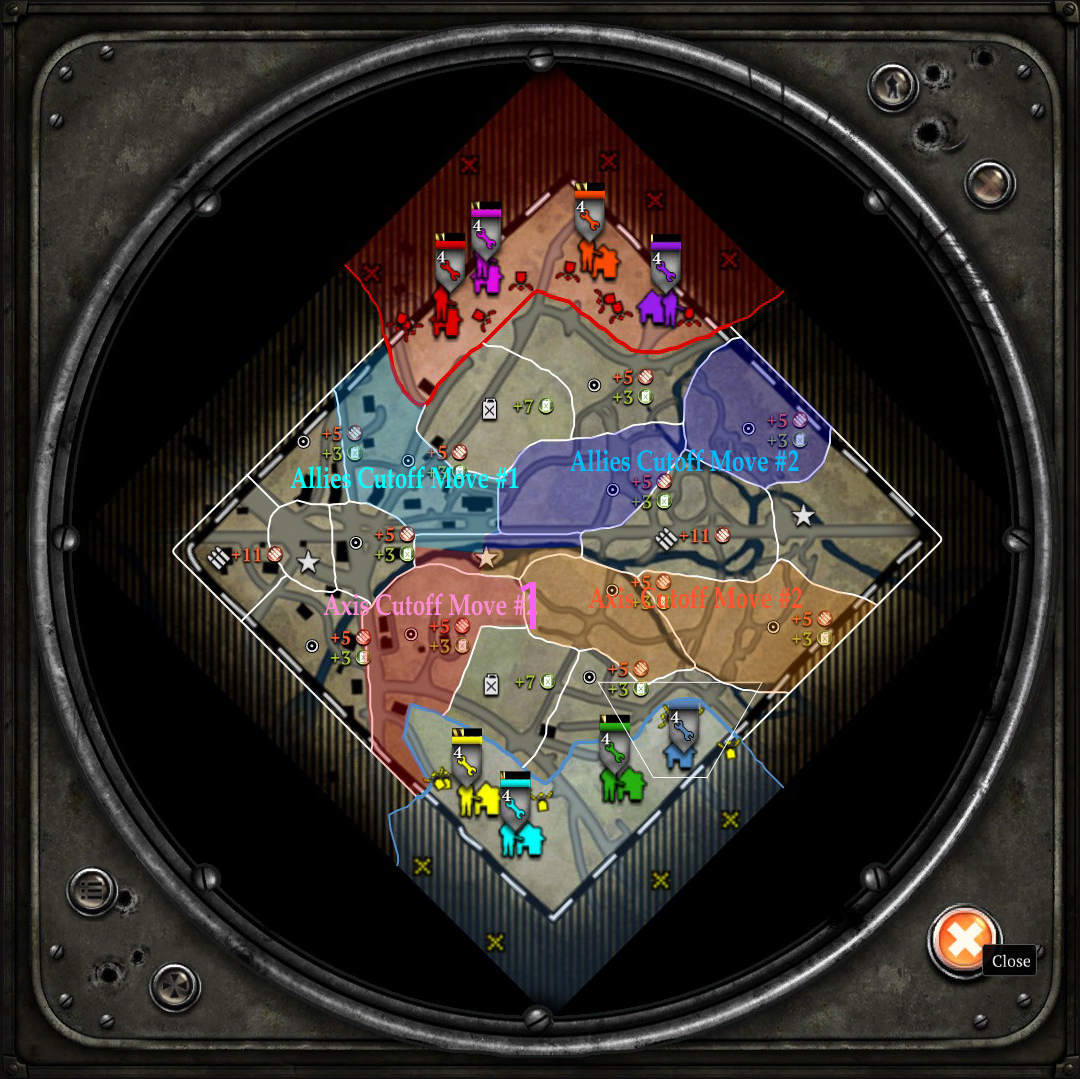
Figure 1.15 Four possible/easiest cutoff moves. Note the middle victory point is always involved.
It is also useful to note that there are no major cutoff moves present in maps like Semoisky. To deny enemy of their resources for a reasonable amount of time, you are better off taking the points frontally rather than embarking on a complicated cutoff move. However, if the middle victory point is in your possession, it might be good to go for cutoff move #1s. Buildings in those sectors can help to hold the territories until the frontline catches up. But it is also where people like to pass through before getting to the frontline or set up indirect weapons teams.
In conclusion: an uncontested fuel and a normal sector in conjunction with base sector resources give total of 11 munitions and 14 fuels accordingly (excluding OKW). Add to that the three generally safe normal territories, the resource income boosts up to 26 munitions and 23 fuel (excluding OKW). In an even match, this is more or less the minimum resource income and can be increased significantly by either by taking more frontline sectors or building caches.
Frontline Territories
Map Tactics and Strategies
Due to the map having varied landscapes across the map, tactics and strategies also vary depending on which spawn point you got. There are three major sections of the map:
Left VP/Town Section
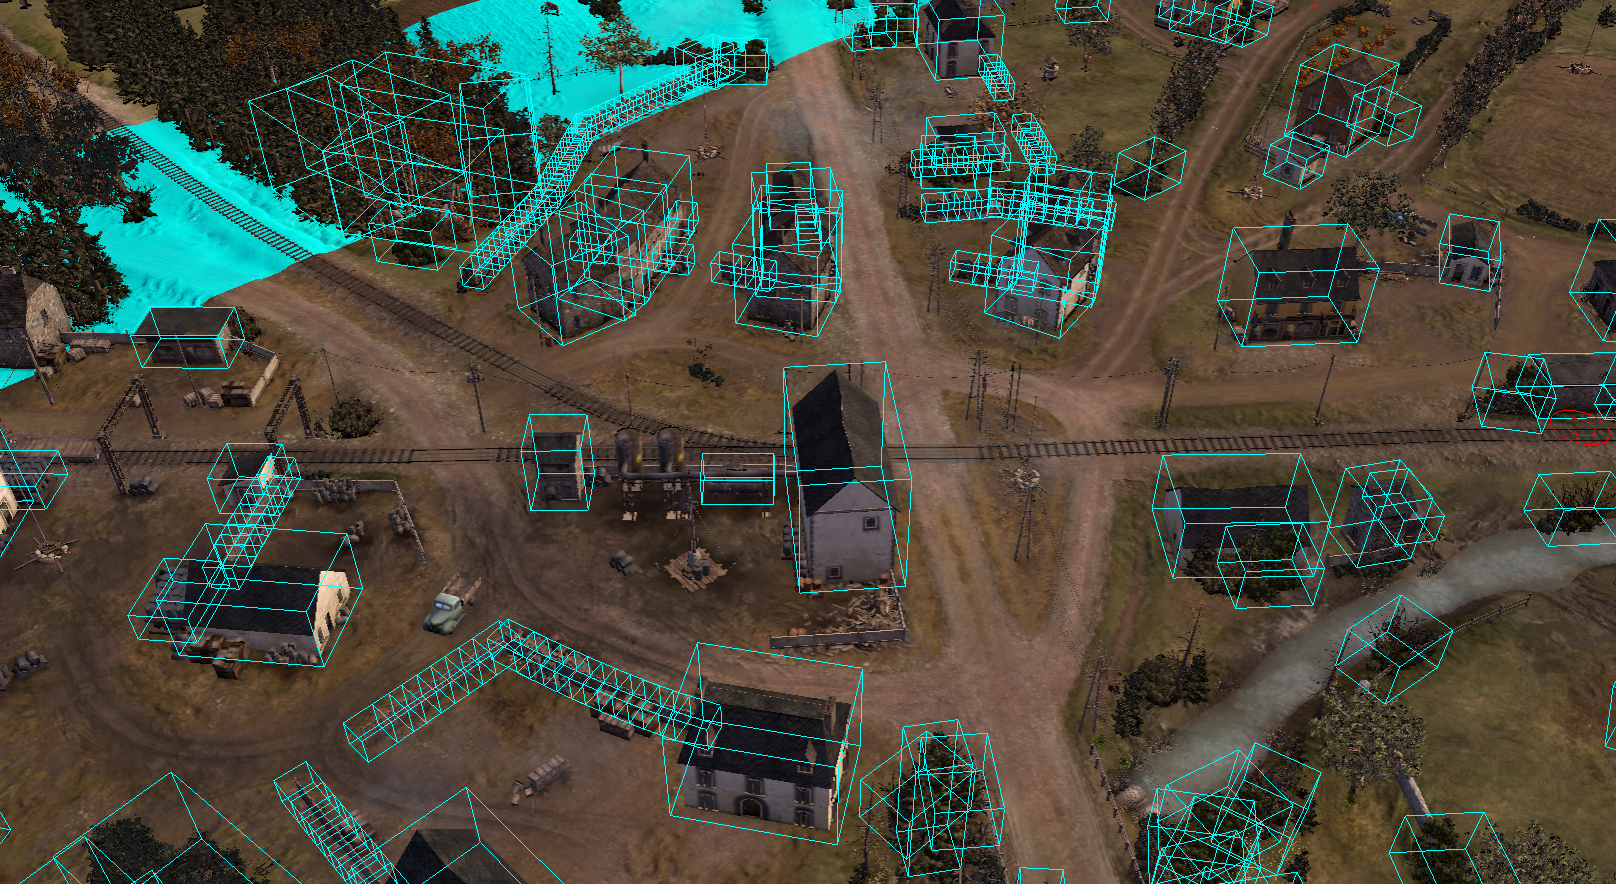
Figure 2.10 Line of sight, shot blockers and impasse in this part of the map.
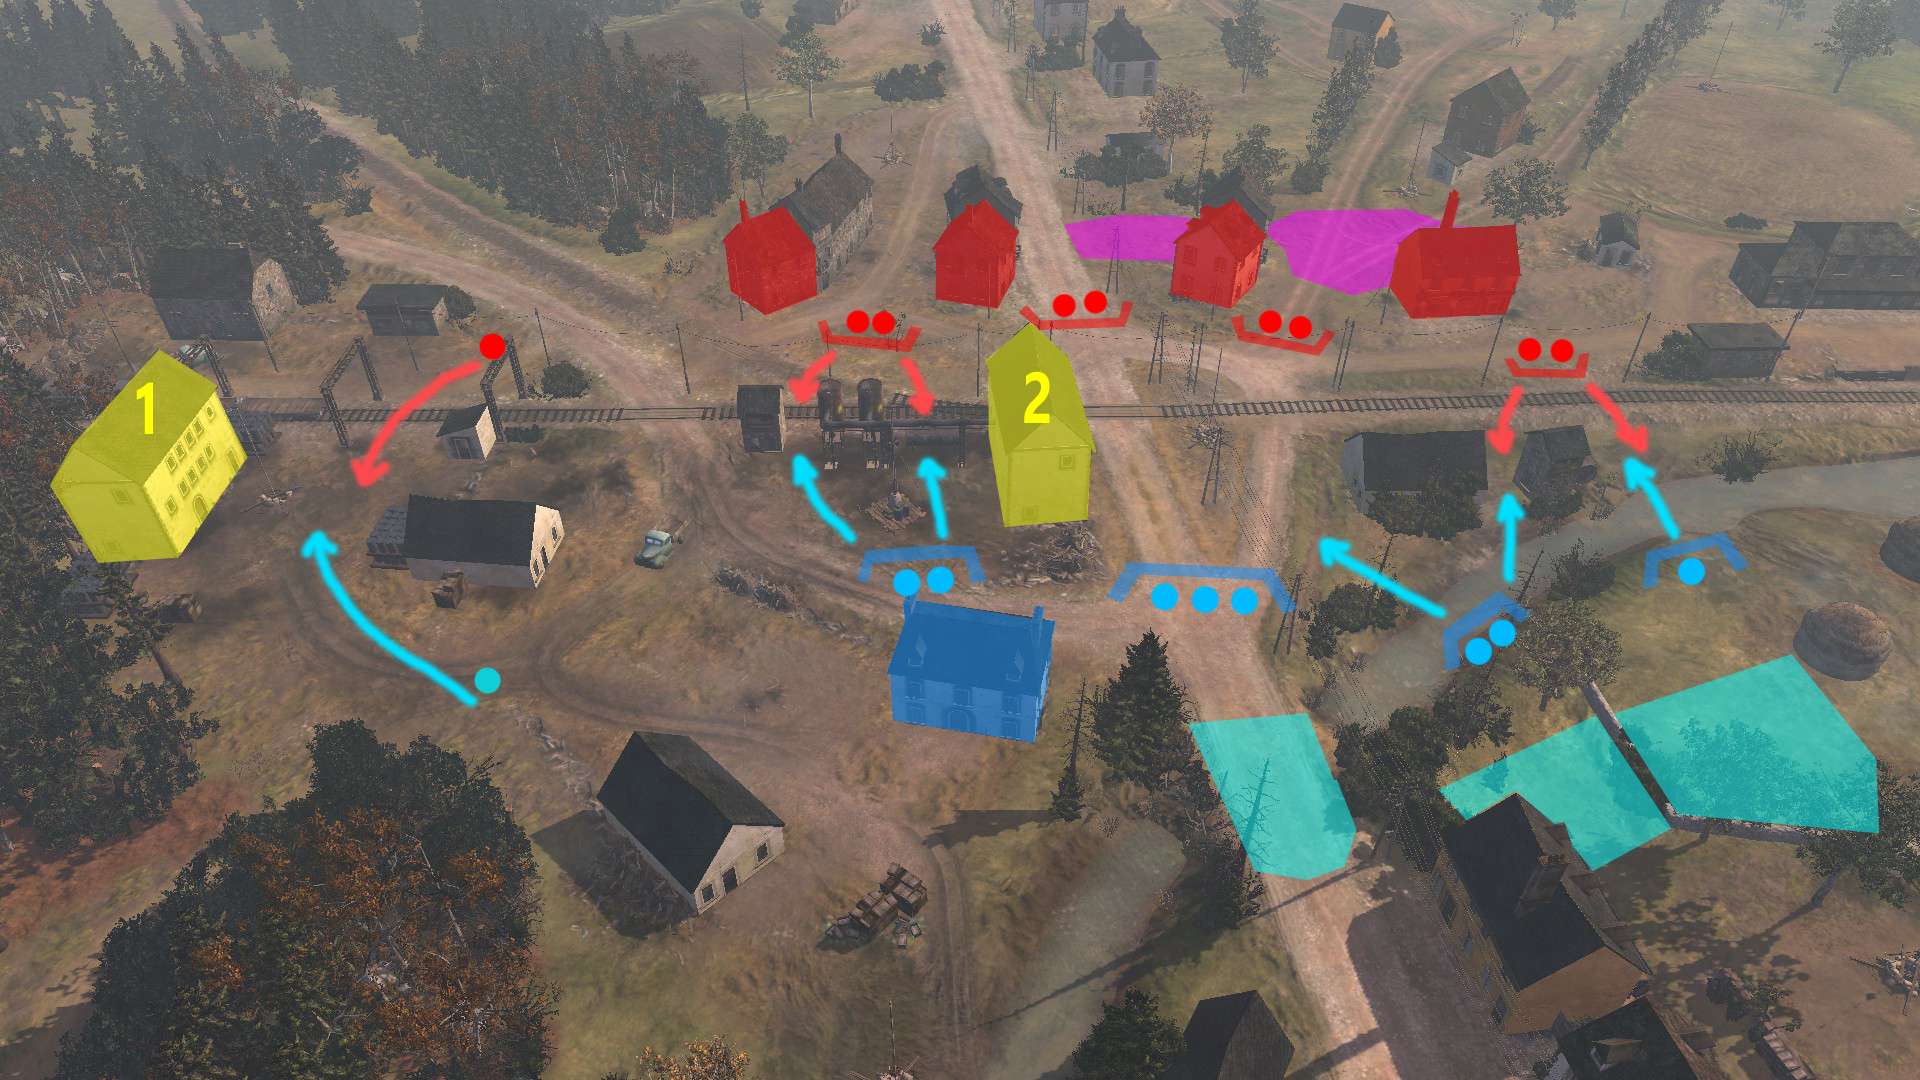
Figure 2.11 General deployment of forces in the town.
The highlighted part of the terrain indicates where indirect fires and reserves are usually placed. Aggressive forward reinforcement point could also be deployed there, but they are generally placed a little more back. The yellow buildings indicate important early game 'just rush for it asap' buildings. The number 1 building's sole role is to watch over the munition point and the garrison units there will not have any other impact on the battlefield. The number 2 building matters a lot more; it gives a huge line of sight (other buildings do as well) and it is in the centre of the main battlefield. Whoever grabs it first will have a huge initiative during the initial engagement. Also note that the blue-highlighted building has its only entry on the south side, so be aware when trying to grab it if you spawned on north.
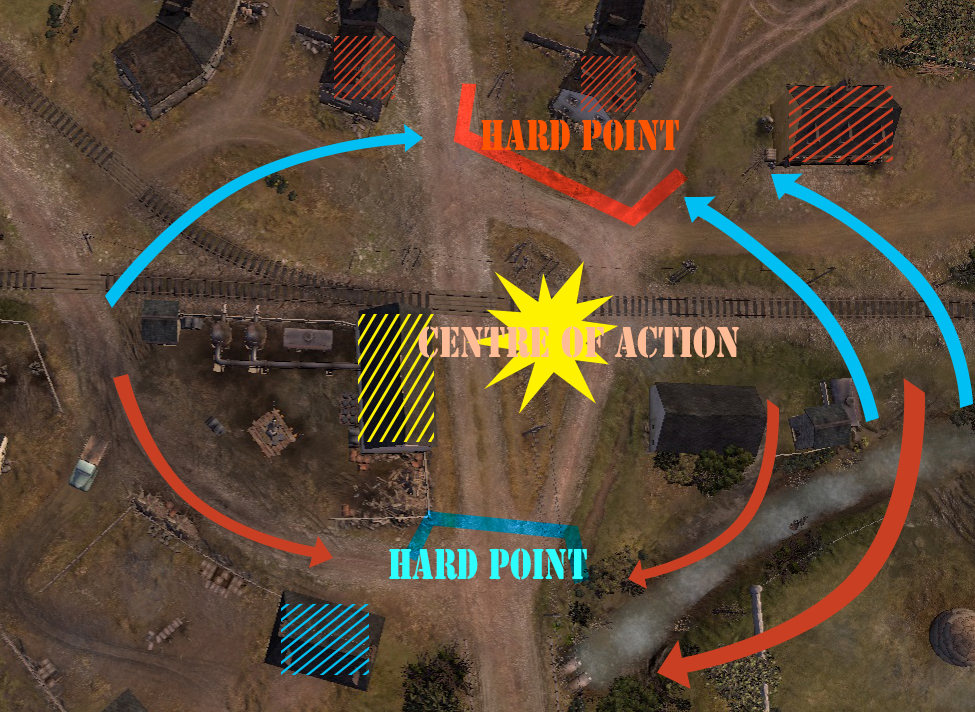
Figure 2.12 Possible and flanking maneuvers commonly seen in this part of the map. However, the plethora of buildings plus a long march through an open road/field make it risky.
The last diagram shows how the frontline forms after an even initial engagement. The centre of action forms in the "no cover" area, making it highly dangerous and encouraging flanking maneuvers and indirect fire. Due to the high number of buildings in this area, indirect fire and flame weapons are very good choices. General infantry: conscripts, grenadiers, riflemen and volksgrenadiers are also good for snatching buildings, flanking and keeping up presence in the lines. HMG teams are also invaluable because they can take advantage of the open landscape or buildings to suppress infantry from afar. It is a very good idea to plant mines in the flanks for obvious reasons.
However, if the northern team wins the initial engagement, the southern team can be locked down below the stream quite easily and having to cross the stream under fire makes it hard to come back to the town. The southern team can take advantage of plethora of combat-significant buildings on the northern side in the beginning by snatching them up initially, halting the enemy's advance and keeping the pressure up with units following up etc.
The town is regarded more important than the forest for the most part. Even if one team loses forest, they can shut down any flanks coming from it with a handful of defensive mines. The town is also closer to the middle victory point. If a team fully controls the town, it is very easy for them to swing to middle slightly and threaten the enemy fuel sector. This is why sometimes, three members of the team commit to town initially while one is tasked with delaying two enemy forces in the forest while the town is being taken.
Middle VP/Train Station Section
This part of the map is either empty, guarded by a HMG crew or the centre of heated battle. In the early phases of the battle, players would usually focus more on town and forest because they have munition sectors. This leads to this part of the map being largely vacant while a single unit from each team might contest for the middle VP initially. However, as game progresses, VP becomes more important than resources and this area can quickly turn into a fierce battleground.
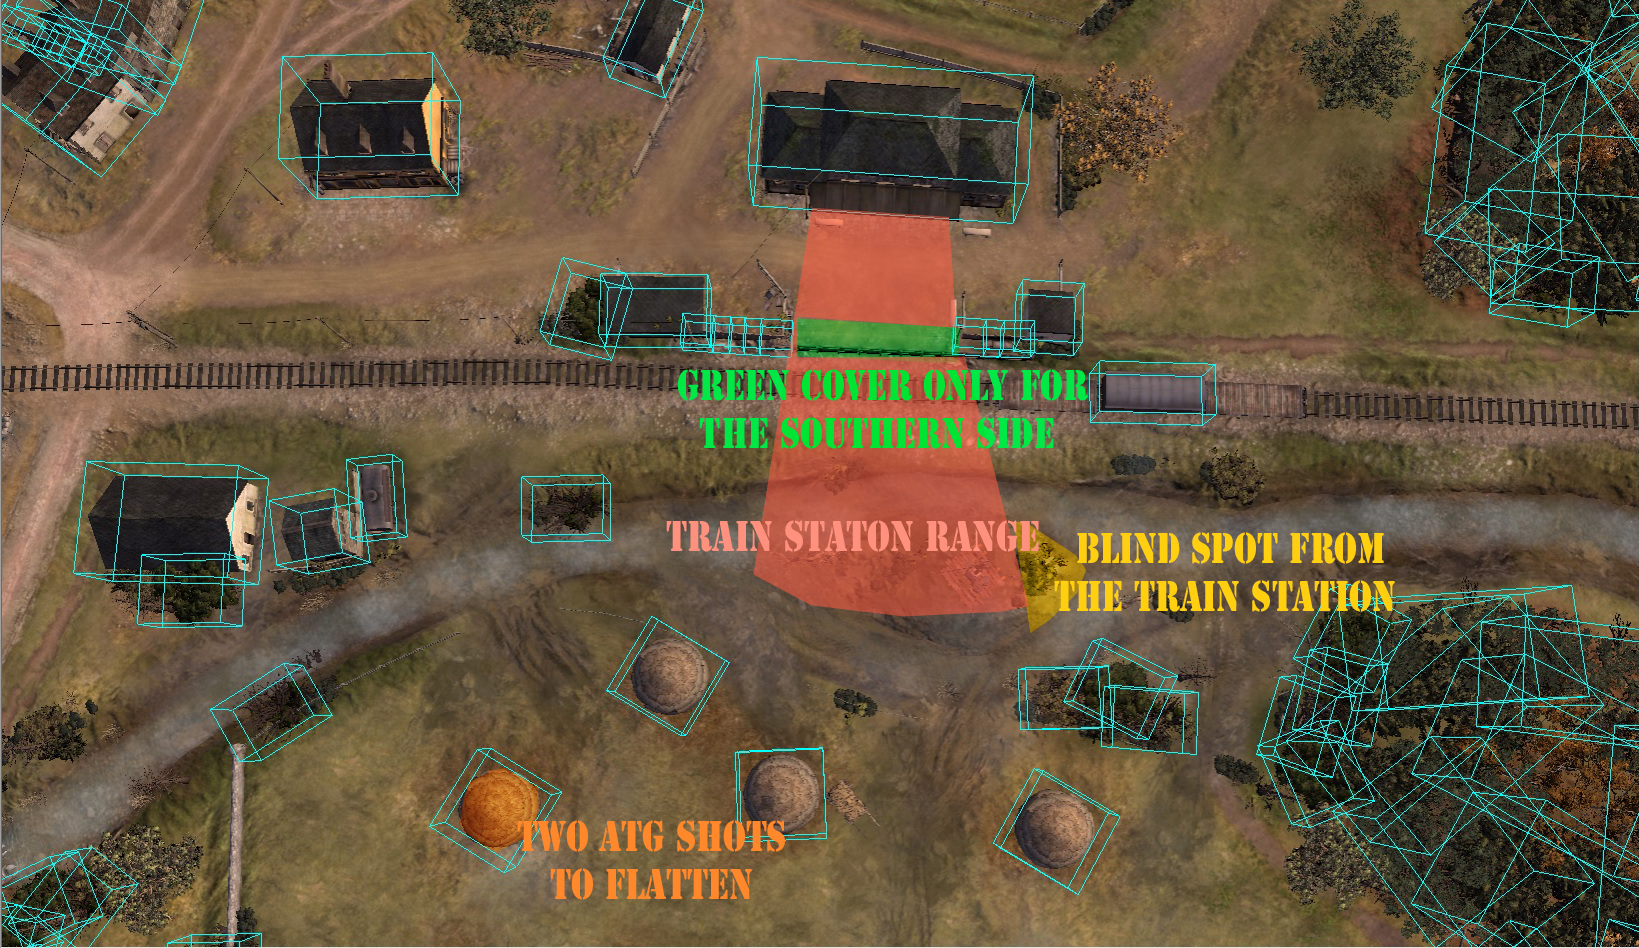
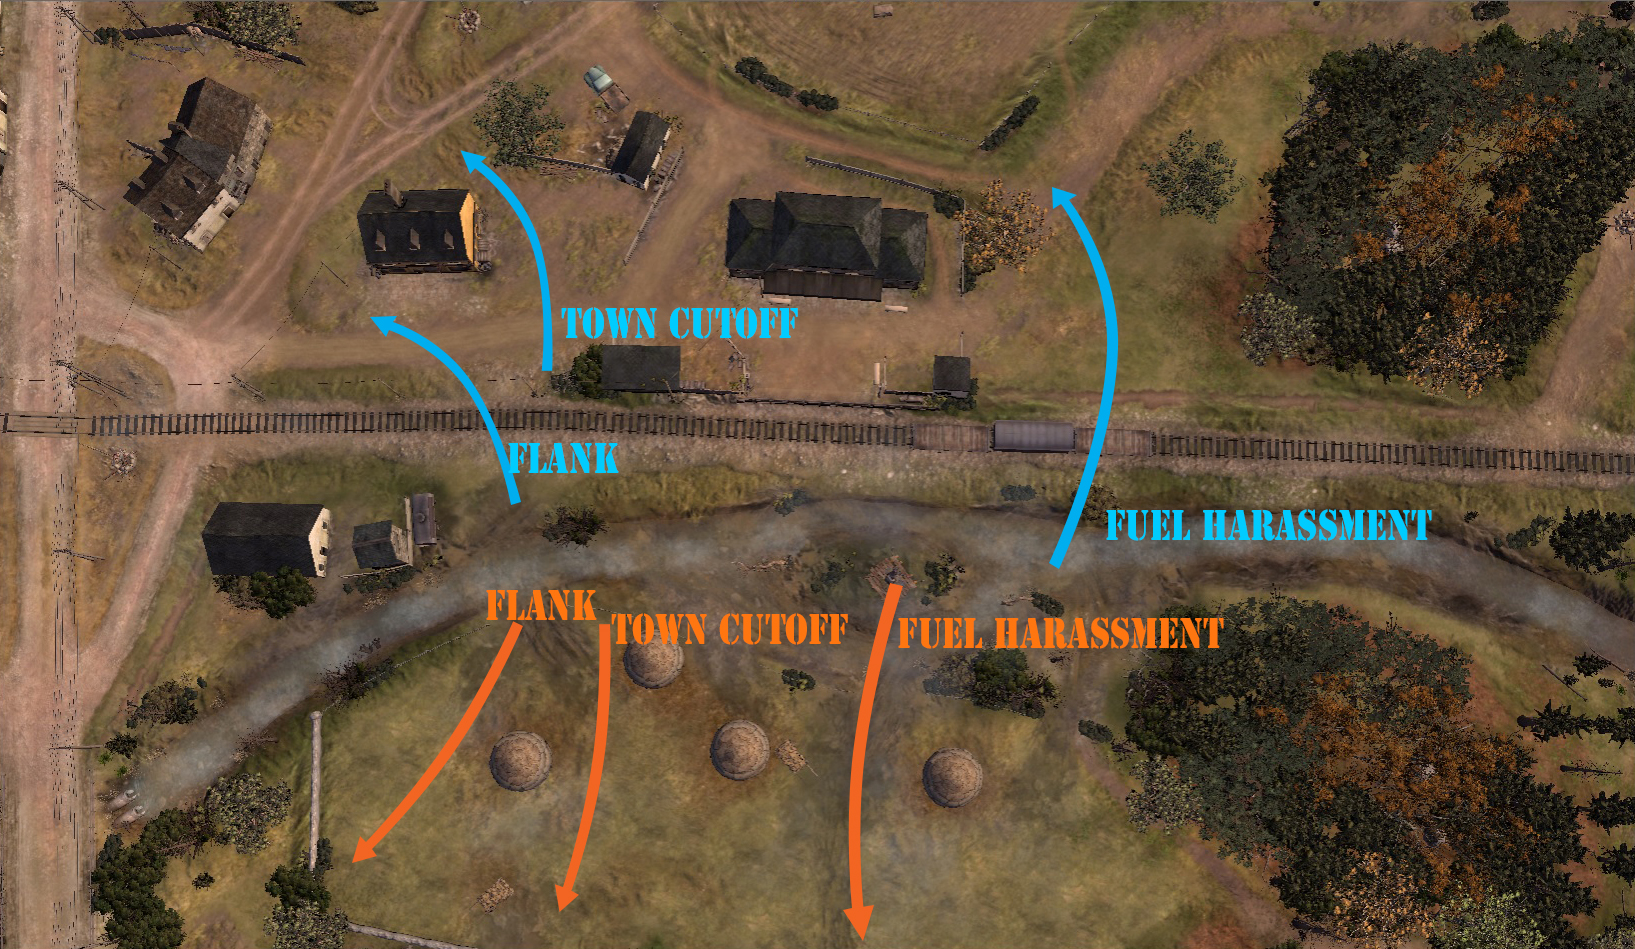
The imposing train station on the northern side creates a huge advantage for the northern team in terms of controlling the middle initially. As game progresses, artillery, tanks and assault guns appear and the armour on the wide open field of the southern side (once haystacks are flatten) will have less room for hiding but more room for maneuvering.

Figure 2.20 Shot/LOS blockers and other useful information.

Figure 2.21 Possible maneuvers when this section of the map is empty.
The imposing train station on the northern side creates a huge advantage for the northern team in terms of controlling the middle initially. As game progresses, artillery, tanks and assault guns appear and the armour on the wide open field of the southern side (once haystacks are flatten) will have less room for hiding but more room for maneuvering.
Right VP/Forest Section
This part of the map is as important as the town in terms of resources. It consists of a labyrinth of tight pathways until you reach the halfway between your base and the enemy's, where it suddenly turns barren. There is a room to maneuver for keenly eyed. Although light vehicles have limited room to maneuver, medium+ tanks would be able to flatten most of the forest and have easier pathing in the forest.
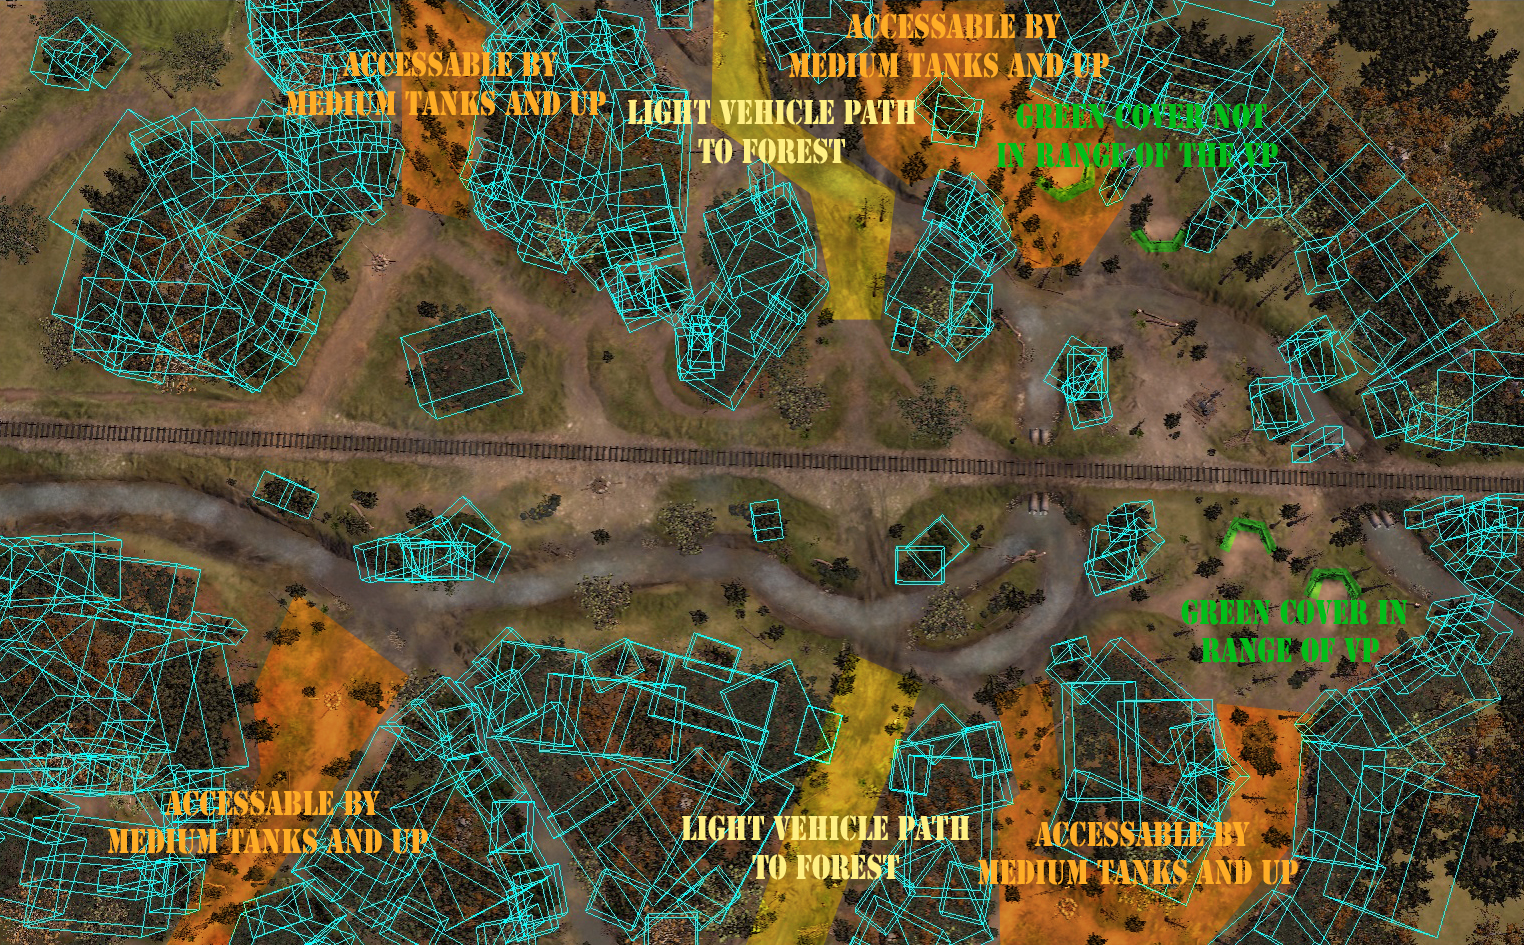
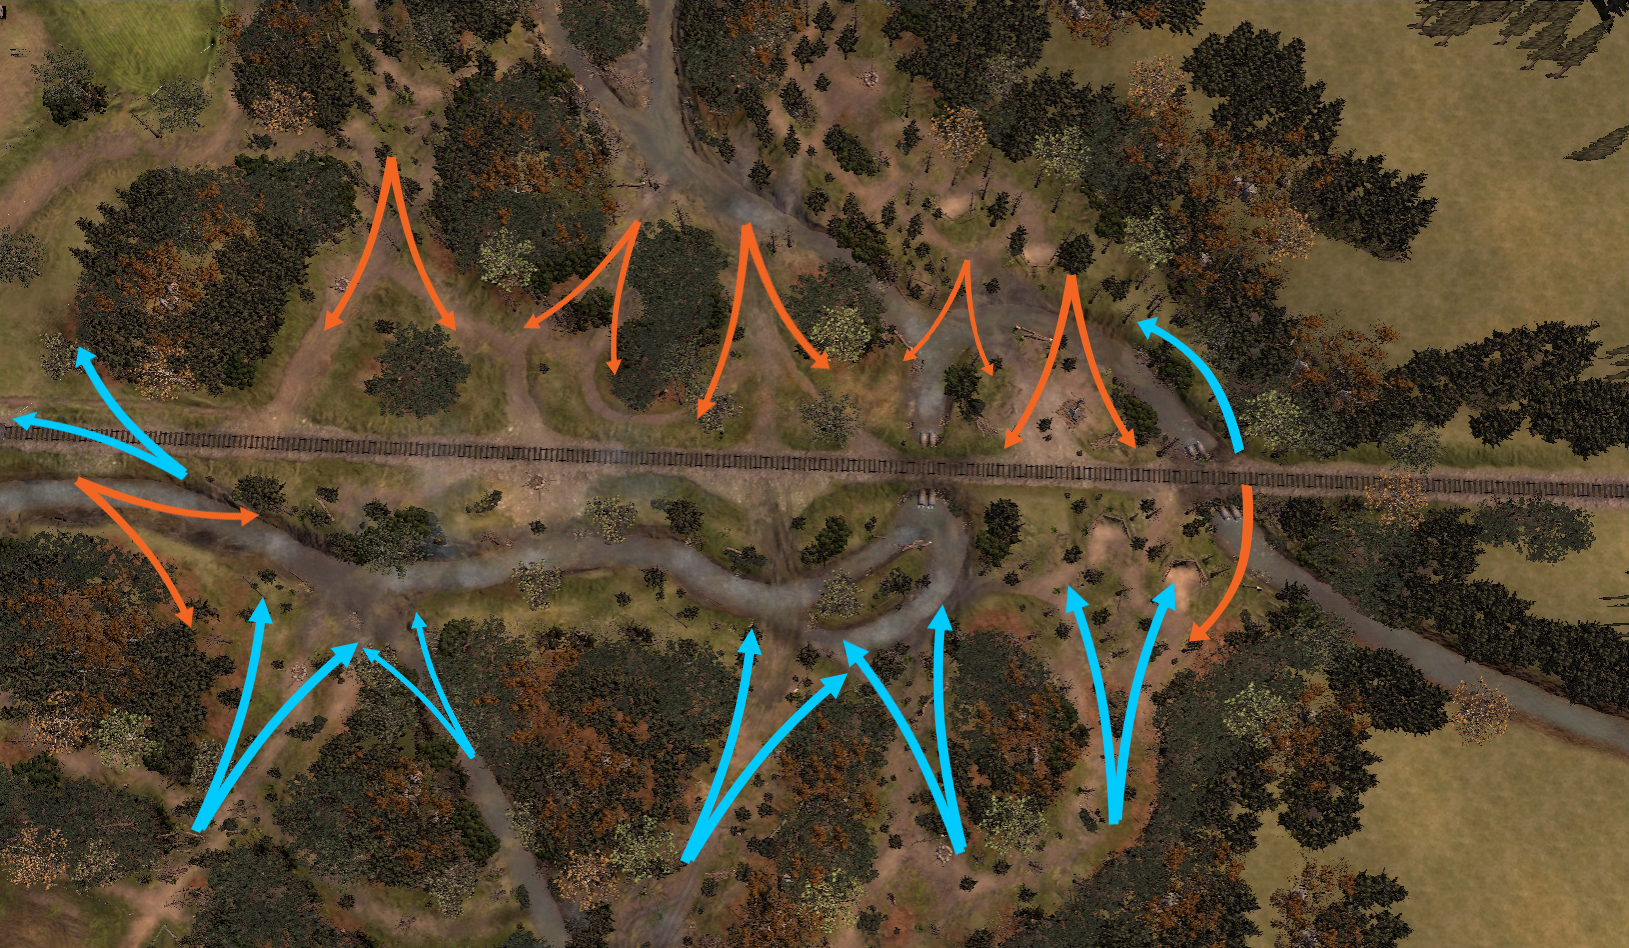
There is no meaningful cover in the forest except on the right VP sector. For this reason, static frontline is more of a rarity in the forest than in the town. If one side is able to dominate the forest, the dominating team can constantly three "safe" sectors (two normal resource and fuel points). They can also completely lock down the forest using barbed wire, tank traps and explosive traps. This is possible because the entryways to the forest are all very narrow and tight. However, defenders can do the same and mitigate the loss of forest using the defensive structures on chokepoints and focusing on other parts of the map to force enemies to displace from the forest.

Figure 2.30 Shot/LOS blockers and other useful information.

Figure 2.31 General deployment of forces in the forest.
There is no meaningful cover in the forest except on the right VP sector. For this reason, static frontline is more of a rarity in the forest than in the town. If one side is able to dominate the forest, the dominating team can constantly three "safe" sectors (two normal resource and fuel points). They can also completely lock down the forest using barbed wire, tank traps and explosive traps. This is possible because the entryways to the forest are all very narrow and tight. However, defenders can do the same and mitigate the loss of forest using the defensive structures on chokepoints and focusing on other parts of the map to force enemies to displace from the forest.
Faction Tactics
The map's environments are very diverse. This means that a diverse unit composition is a great idea and almost all units can be useful. The 4v4 setting only amplifies this notion.
General Tips
- It is true that the city is tempting and the side that gets there first has a big advantage, however teams that over-commit there often get punished. I have seen great success where teams push heavily in the forest onto the fuel or in the middle and seize the cut offs next to the fuel, once that happens forces in the city can no longer be supported and will retreat through enemy fire. If a FHQ goes up in such a position or you can get MGs in the buildings the game will often be won or lost at that point
- Artillery from basic non doctrinal mortars to Walking Stuka to B4 are essential. Any 4v4 matches can lead to a slug-fest. A slug-fest can be solved by two solutions: The first one is to launch a coordinated frontal/flank attack that demolishes enemies' army in an epic battle. However it is very risky and hard to pull off. Another way to win a slug-fest is to win the artillery war. A side with dominating artillery would eventually wear the other team down.
- Good unit composition throughout the entire team. Obvious, but I say this because it is a popular sentiment that 3v3+ is a spamfest with no tactics or strategies whatsoever. However from my extensive experiences, in an even match, a team with better composition would prevail. Have infantry, HMG, ATG, artillery and all kinds of tanks.
- Mines.
- Teamwork and communication.
- In 3v3+, it is crucial to hold initiative as a team. To achieve this, you must be aggressive and choose where to have a fight. Once you gain in one area, do not be afraid to exploit the advantage and move onto other areas. Setting up defenses is essential at times, but it also gives your opponent time to regroup. A constantly fluctuating battlefield will make even the most experienced teams have hard time keeping up with the flow of the match.
Allies Specific
- Penal Battalions and their satchels and flamethrowers. Their SVT works great on close to mid range combats in forest. Their flamethrowers and satchels are great in the town where buildings are a centre place of action. Opportunity costs are conscripts and their upgrade-able molotovs and anti tank grenades OR early maxims and their efficient early retreat capabilities with minimal manpower loss.
- Building hopping with forward headquarters can catch Axis off guard and let you quickly take more than half of the map. This will help other Allies players to tech up quick and bring heavier firepower.
Axis Specific
- Stuka dive bomb. Uncountered B4 or even ML-20 howitzers are brutal and can easily lead to the downfall of your team. Always be ready to counter these howitzers as soon as possible. Recon + Stuka dive bomb is the best way.
- Infra-Red Half-track. It is always nice to see what your opponent is doing. This unit is especially good in team games where one active IR Half-track can easily watch two or more players.
Conclusion
Lienne Forest is a fun and diverse map. Its breadth of diversity induce varied combats across the map. The tactical layout of the map encourages all types of units. The map is not as barren as Steppes but still very maneuverable. It is balanced and does not favour one faction or spawn location like Faceoff at Rostov. For me, this map is a definition of a good map; it has diversity, interesting map layouts, balanced and most of all, fun.
It is also a better 3v3/4v4 hybrid map compared to other hybrid maps in the map pool.


